Fossil Flora - Photographing Plant Fossils In Situ - Part Three
 Friday, May 3, 2013 at 8:41PM
 For the most part nature photographers strive to capture their subjects in the early morning and late afternoon when the light is lower to the horizon. During this “golden hour” the colours are highly saturated and are much more pleasing to the eye than if the photograph was taken during the middle part of the day in full sun. However, photographing fossils in-situ is a little different as often there was a few hours hiking to find the fossils and it wasn’t possible to wait until early morning or later afternoon to take the photograph.
Techniques
It's important to realize that photographing fossils is identical to photographing anything else - there are no set rules - only guidelines. Use your imagination and the equipment you have on hand. The process to photograph fossils in-situ is nothing magical; however, there are a few techniques that will improve the photographs markedly.
- Always use a quality tripod and ball head that when locked down, is tight and does not move. A tripod that allows the ability of the head to be maneuvered to odd positions is a distinct advantage when photographing something that cannot be moved and is probably located in a relatively inaccessible location (rock crevice, overhand, etc).
- Fossil leaf photography is essential macro photography; therefore, use quality lenses and if possible a full frame camera. Ensure you use a timer release as many of your images will be taken at slow shutter speeds to ensure adequate depth of field.
- Use a solid board to mask your subject from the wind. The wind is quite normal in mid latitude arid areas and can cause camera movement if shooting at a slow shutter speed.
- Use a reflector board and largish diffuser to remove stark contrasting lines that may otherwise ruin your image if you are shooting during the middle parts of the day.
- Make use a fill flash to add, remove or change the location of shadows. Use a wireless flash head (or similar) to avoid any camera movement that maybe caused by the flash head or cord moving. A remote head also allows you to position the flash (s) at suitable distances and at odd angles to your subject.
- Do not use ETTL, but use M (manual) to determine the exposure setting for the flash. You do not want a 100% flash photograph, but an image that was taken with a subtle amount of fill flash.
- Try to use a diffuser with your flash. I’m not discussing the small “clip on” diffusers but, a largish diffuser that can be held at varying distances from your flash head. A diffuser will lower the starkness of the light emitted from the flash. Using a flash as a fill light will enhance the light that may otherwise cause an object in plan-view to appear flat and uninteresting.
- Be aware of the colour of your surrounding environment; central Australia is predominately red (from iron oxides) and photographs taken will inadvertently take on a reddish colour cast.
- Ensure you white balance your images appropriately. Although this can be done in post processing, I prefer to take my time and white balance the images in the field; after all, the fossils are not going anywhere in a hurry… I use a white balance card.
- Depending upon what you are attempting to achieve, position the camera lenses at the appropriate angle to the subject. For instance, if you wish to create a scientific photograph in which the complete fossil is shown, position your camera and lenses so that the lens plane is parallel to the subject. This will ensure that the fossil (in plan-view) will be in focus, even if using minimal depth of field.
- If your photographs look flat and lack texture because of the bright light from shooting in the middle of the day, try spraying some water from small squeeze bottle onto the fossil. Often, a little water will make the colours and texture of an otherwise flat object pop.
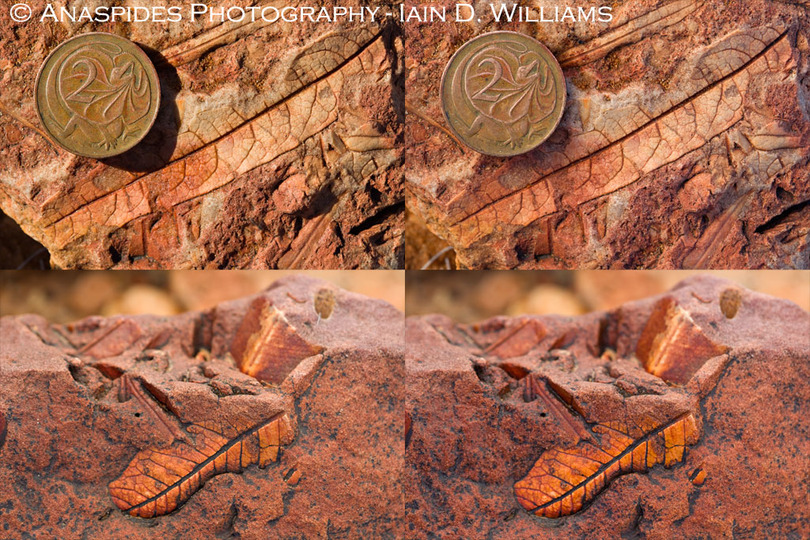
The below images are case in point. The photograph on the left was taken without a diffuser or fill flash while that on the right was taken with a diffuser, soft fill flash and a quick spray of water on the rock. Conditions were full sun. Note the subtle differences in colour, texture and shadow. Click image for larger view.
Fossil photography is often done for scientific purposes; therefore, the photographic layout must comply with certain guidelines such as the inclusion of a ruler or known size object to provide a scale. The subject should also be photographed completely flat with all aspects of the fossil in focus.
However, if you’re not bound by these guidelines, composition is very important. Position the fossil so it’s at an angle rather than vertical or horizontal; using angles gives your subject more visual power. Try using minimal depth of field to add illusion to your image or attempt to place something in the image which provides scale.
Looking at three images below, you will note the leaf in the right hand photo is at an angle forming a triangle in the image, while the center image shows part of the landscape surrounding the fossil and places the fossils in context with its surrounding environment; this creates interest. Finally the Eucalyptus leaf I have positioned vertically with the apex of the leaf pointing downwards. The reason for this composition is that it replicates the way extant (present day) eucalyptus leaves appear on trees – pointing downwards.
If you navigate to the second journal post on this subject you will observe that I’ve also used minimal depth of field on one of the leaves to provide illusion.
Problems or Challenges
If you cater towards everything mentioned, you’ll almost need a mule to transport your equipment. Carrying the gear was one of my biggest concerns on this trip. We were walking considerable distances for most of the day in very warm temperatures. Carrying the photographic equipment, food and other essential items such as map, compass, DGPS and 5 litres of water was tedious.
Add to this a constant wind and bright sunny conditions, and photographing fossils became an enjoyable challenge.
This is a short video I made of the trip. The reason for the relatively lengthy four wheel drive sequence is to indicate the length of time it took to reach the location. If your computer is not powerful, click HD to remove High Definition and view at a lower resolution.
The below plate depicts a few of the fossils found and photographed in-situ. No fossils were removed or collected; this being an illegal activity in Australia. I have purposely not included the identification of each fossil. Click image for larger view.
This is the final post of three dealing with this excursion. To read the first post and second post click here.


Reader Comments (2)
wonderfull fossis plantsl and video, greeting from Belgium
Thank you Louisette. Best, AP